Welcome to my FFXIV Raid Guides!
For today's Extreme Trial, we'll be doing The Seat of Sacrifice (Extreme).
Check out these other FFXIV content:
Raid Guides List | Sing-Along Lyric Videos | Listen to FFXIV Soundtrack
Raid Guides List | Sing-Along Lyric Videos | Listen to FFXIV Soundtrack
Watch the video guide:
PART 1
Terror Unleashed - reduce everyone's HP to 1 + Living Dead on all players. Healers top everyone up
To The Limit: Solemn Confiteor - all players will poop circle AoE on the floor. Step away when they appear
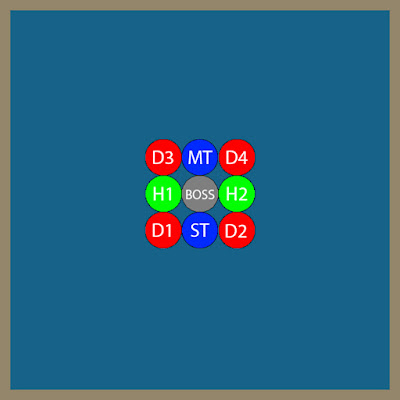
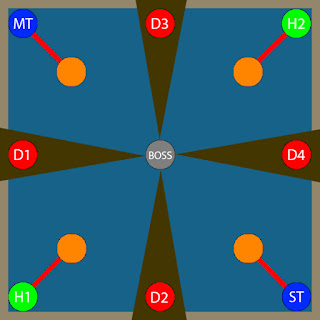
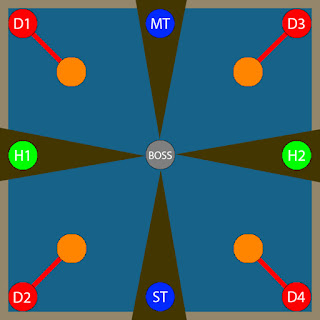
Absolute Stone III - conal AoE on everyone. Spread to clock positions
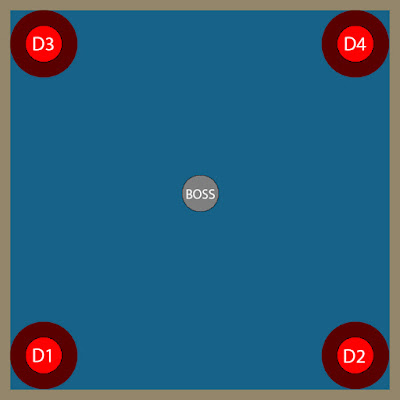
Limit Break: Radiant Meteor - proximity AoE will drop on 4 players. Assign 2 players to each corner and bait meteors
Imbued Saber x2 - he will gain debuff of Stone / Holy + Fire / Ice that will be used in a later mechanic
Imbued Coruscance - 3 attacks will happen at the SAME TIME:
A.) Stone or Holy - if Stone, spread to your assigned clock positions. If Holy, stack together
B.) Fire or Blizzard - if Fire you will get damaged if you move or attack so stay put. If Blizzard, move when it casts or you will be frozen
C.) Sword - check his sword. If it's just glowing, maintain distance from him. If there are donuts on his sword, move inside his hitbox
Example: Stone + Blizzard + Glow = Clock positions + Keep moving + Away from boss
To the Limit: Sword of Light + Absolute Holy
1.) 3 swords will appear and draw 3 triangles on the arena. Stay at the middle at first while looking for the one side without a glow. Run towards there
2.) Shareable AoE on 1 random player. Because of the triangles, coordination is important- everyone must go to the same safe spot so you can soak damage
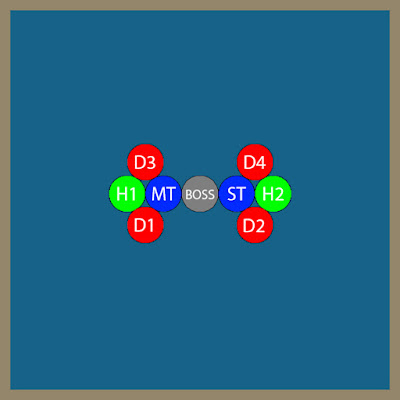
Limit Break: Desperado - straight-line shareable AoE on both. Split the party into 2- 1 tank, 1 healer and 2 DPS on opposite sides of the boss
To the Limit: Imbued Saber x2 + Coruscance Combo
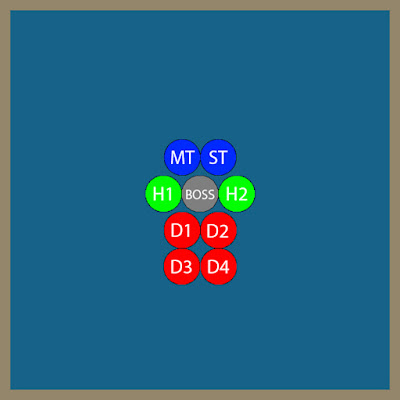
Limit Break: Radiant Braver - conal AoE on tank, healer and DPS. Tanks go to north, DPS on south, healers on either east or west
The Bitter End - tankbuster + vulnerability up on target tank. Swap tanks during cast
Summon Wyrm + Solemn Confiteor + Absolute Flash
1.) Solemn Confiteor - bait AoEs in the middle
2.) Wyrm Dive - A dragon will appear on a random side of the arena and will do AoE towards half of the arena he is facing. Wait for Solemn Confiteor to drop in the middle before running
3.) Absolute Flash - 1 random player will be casting Flash. Look away. He can go to the edge while everyone is looking away near the boss for damage uptime
Elddragon Dive - raid-wide AoE
PART 2 - SPECTERS OF LIGHT / ADDS PHASE
WAR and DRK appear - tank DRK at the west and tank WAR at the east to avoid them tethering. Assign 1 healer to stay close for each tank
WAR: Fatal Cleave - tankbuster
DRK: Blade of Shadow - tankbuster
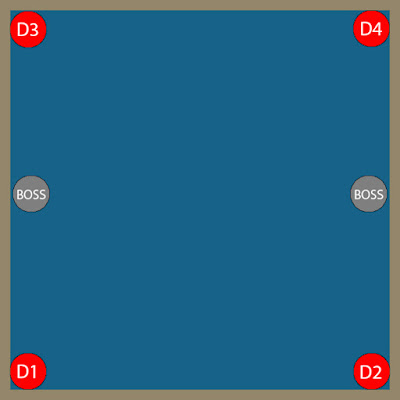
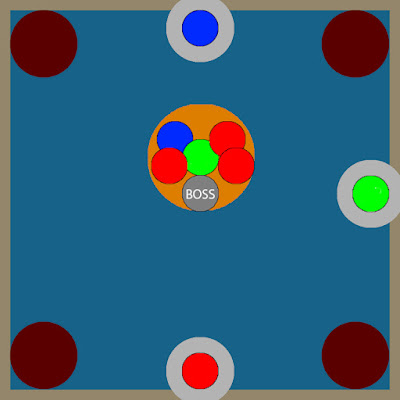
BRD: Deluge of Death - Proximity AoE on all DPS. Assign each one a corner and drop it to the edge
NIN: Katon - shareable AoE on each healer. Share it with your partner tanks
WHM and BLM: Twincast - 2 meteor towers that must be manned by 2 players each. Have all DPS manage the towers after Deluge of Death
SMN: Summon Egi / Flare Breath - dragons will tether to 4 random players and will do conal AoE on them. Tanks and healers get 1 each and face them away from the party
WAR: Berserk - tanks silence this attack!
DRK: Deep Darkside - tanks silence this attack!
WAR: Fatal Cleave
DRK: Blade of Shadow
BASICALLY:
Tanks / Healers: tankbuster > shareable AoE > stun tanks > dragons > tankbuster
DPS: proximity AoE > towers
Ultimate Crossover: use tank LB3 when he says 'For Victory'. Heal up quick after
PART 3
Specter of Light - there are 4 kinds of these and they will be used in random order, similar to Gunshield mechanics in Memoria Misera (Extreme). Before continuing with the rotation, I'll explain first the 4 kinds:
Specter of Light Set - NIN
1.) Imbued Sword (Fire, Blizzard or Stone)
2.) Solemn Confiteor - bait them in the mid
3.) Suiton - strong knockback from a random side of the arena. Look for water animation. Go to that edge while prepositioning for next mechanic. Split into the usual teams of 2 while at the edge- north to south. Don't clip other groups with your AoE
4.) Katon - shareable AoE on 4 players. Will drop right after Suiton so you better be in position beforehand. Split into your usual groups of 2 and again, don't clip others
5.) Imbued Coruscance (Sword In/Out + Fire/Blizzard/Stone)
Specter of Light Set - SMN and WAR
1.) Imbued Saber (Fire, Blizzard or Stone)
2.) Solemn Confiteor
3.) Perfect Decimation - conal AoE on 4 players (T/H or DPS)
4.) Summon Egi / Flare Breath - 4 players will be tethered (T/H or DPS), get conal AoE and get debuff
How to Handle 2-4:
- everyone stay in the middle.
- wait for the 4 who will get the 'Perfect Decimation' markers
- those with Perfect Decimation markers should run to their assigned cardinals
- the other 4 who have no markers run to your assigned intercardinals, get the tether and face the dragons outwards
5.) Solemn Confiteor
6.) Perfect Decimation + Flare Breath 2nd set
How to handle 5-7:
- the other 4 (previously tethersd) will now be targetted with Perfect Decimation
- run to your assigned cardinals
- the 4 who previously got Perfect Decimation, run to your assigned corners / intercardinals to get the dragon tethers and face them away
8.) Imbued Coruscance (Sword In/Out + Fire/Blizzard/Stone)
Specter of Light Set - DRK and BRD
1.) To the Limit: Brimstone Earth (DRK) - all DPS will drop growing AoE. Bait them at the edge of your assigned corners / intercardinals after baiting Solemn Confiteor at the mid
2.) Solemn Confiteor - bait at mid. DPS run to corners afterwards to drop their growing AoE
3.) Deluge of Death - proximity AoE on 3 players. Pop them at cardinals. If Brimstone Earth is dropped at the edge of corners it won't reach cardinal positions
4.) Absolute Holy - shareable AoE on random player. Stack in the middle
Specter of Light Set - BLM and WHM
- 8 sets of meteor towers that need to be manned by 2 people each will drop one by one, overlapping a bit. Use the previous pairing
- When you take a tower, you get a debuff so you can't take another tower right away. Follow this order of taking out the towers with your partners:
Pair 1: MT and H1 > Tower 1 and 5
Pair 2: ST and H2 > Tower 2 and 6
Pair 3: D1 and D3 > Tower 3 and 7
Pair 4: D2 and D4 > Tower 4 and 8
Rotation Continuation:
1st Specter of Light Set
Elddragon Dive
The Bitter End (tank swap)
Quintuplecast - 5 previous mechanics cast sequentially in RANDOM ORDER. You have to look at the animations and memorize their cast sequence, and act accordingly based on that. Here are the skills:
Absolute Blizzard III - move to avoid getting frozen
Absolute Holy - shareable AoE
Absolute Stone III - conal AoE on everyone (clock positions)
Absolute Fire III - stay put and don't attack
Absolute Flash - don't look at the player with Flash marker
Sword of Light + Elddragon Dive
2nd Specter of Light Set
Limit Break
The Bitter End (tank swap)
3rd Specter of Light
Limit Break
4th Specter of Light
Enrage
MACRO
/p ■ Stone Clock ■ Meteor/Bahamut/SMN
/p D3 MT D4 MT/D3 H2/D4
/p H1 ◎ H2 ◎
/p D1 ST D2 H1/D1 ST/D2
/p ■ LB2 Healer Baits
/p MT/D1/D3/H1 ◎ H2/D2/D4/ST
/p ■ Add Phase ----- ★ = Flare
/p (D3★) (D4★)
/p MT/HT ST/H2 *silence (status)
/p (D1★) (D2★)
/p ■ Tidal Wave | ■ 8 Towers: 1>5, 2>6, 3>7, 4>8
/p MT D1 | D3MT
/p ST D2 | D1H1 H2D4
/p H1 D3 | STD2
/p H2 D4 |








0 Comments