Welcome to my FFXIV Raid Guides!
Raid Guides List | Sing-Along Lyric Videos | Listen to FFXIV Soundtrack
Watch the video guide:
PLD Clear Video:
PHASE 1
Ground-razing Particle Beam – raid-wide AoE
The Art of Darkness – upcoming mechanic depends on what animation appears on boss:
Two Orbs - shared AoE on DPS, they must pair with tanks/healers
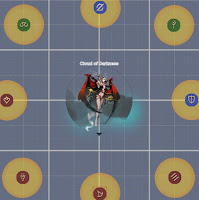
Glowing Boss - conal AoE on every player. Assign clock phase for each
The Art of Darkness - the other mechanic not used in the first one
Devouring Dark - 2-hit tankbuster. 1st hit inclicts debuff AoE and line AoE on 2nd. Main tank can use invulnerability or tank swap while this is cast
Obscure Woods - raid-wide AoE and changes the arena to forest
Flood of Obscurity Combo
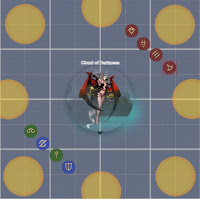
1.) Knockback from boss + players will drop AoE briars
- place briars at the edge of your assigned clock phase
- after dropping the briars, move in a bit near hit box of boss for next mechanic
2.) Rejuvenating Balm Combo
1.) AoE briars will tether to their respective player
2.) tanks/healers will get tethered to DPS
3.) N/S or E/W trees will do big circle AoE
Basically, everyone needs to break their tether + partner tethers then avoid Tree AoEs
How to Handle:
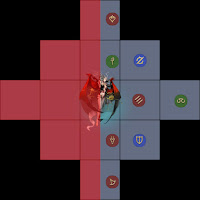
- follow role positioning on diagram. It's designed to break tethers as you go to the safe spots
1.) Stay near boss on assigned clock phases (T/H north side, DPS south side)
2.) Get knocked back on assigned clock position edge, drop brambles
3.) Go back near boss on assigned clock phases
4.) T/H go to southwest while DPS go to southeast to break both tethers
If North/South Trees
- safe zones are east and west
- tanks/healers move to west
- DPS move to east
If East/West Trees
- safe zones are north and south
- tanks/healers move to south
- DPS move to north
Sample of East/West Trees (N/S safe):
ANTI-AIR or WIDE-ANGLE 1ST SET
Wide-angle Phaser Unlimited Set
1.) she will tether to one side, go there and do wide angle AoE
- follow positioning on diagram (party will be split into 2)
- party moves to their assigned edge to avoid conal laser
2.) conal lasers on tanks + shared conal lasers on healers/DPS
- tanks move out to bait their lasers away
- healers/DPS stack with their team for their lasers
3.) AoE around boss
- everyone moves out to avoid AoE around boss
Anti-air Phaser Unlimited Set
1.) she will tether to one side, go there and do AoE around her
- same grouping as previous set, except tanks will be far away first
- stay away from her to avoid big AoE
2.) big AoE on tanks
- tanks stay away from party and from each other
3.) wide-angle AoE
- everyone go to the boss's sides. Tanks may need to use gap closers/sprint as they are far away
Ground-razing Particle Beam
The Second Art of Darkness - 2x The Art of Darkness. 2 animations will appear while casting and will consecutively drop after cast
1st orb - 1 orb either left or right. Half-arena AoE on where the orb is
2nd orb - 2 orbs (partner stack) or glowing boss (clock phases)
ANTI-AIR / WIDE-ANGLE 2ND SET - the other set not used in the first one
Devouring Dark - off-tank can provoke before she starts casting this and he can use his invulnerability. Main tank can provoke back right after
PHASE 2
Empty Plane - raid-wide AoE and changes arena to tiles
Flood of Emptiness - raidwide AoE + removes corner tiles + insta-kill AoE on middle tile + Curse of Darkness (15 second debuff that will have players spew conal AoE when timer runs out)
From this point on, there are rules to follow:
(1) 1 player per tile. 2 players on 1 tile will make it fall off
(2) do not stand on 1 tile for 15 seconds or it will also fall off
You must now coordinate as a team on following these rules, as well as adjusting properly to the upcoming mechanics without breaking said rules
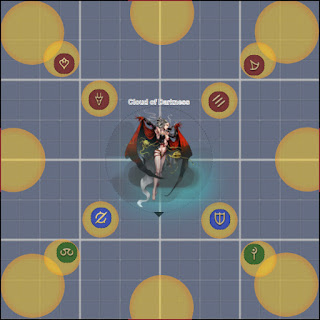
Starting Position:
Hypercharged Condensation - summons 4 cloud adds at cardinals that must be killed before they reach the boss. Players can stand in front of them to slow them. The laser debuff will also resolve while in this mechanic so don't forget to look away before it reaches zero
Full Perimeter Particle Beam - AoE on the outer tiles so everyone must be on the inner tiles
Resetting Tiles Timer - after the beam, this is where you can start resetting tiles every after mechanic/skill the boss uses. Melee can reset first, and then ranged. One at a time. Here are the tile assignments:
The Art of Darkness - 1 orb (left or right)
Reset Tile Timer
The Art of Darkness - 2 orbs (partner stack or clock phases)
Reset Tile Timer
Deluge of Darkness
Summon + The Art of Darkness - summons 2 clones outside the arena that will do the same mechanic as the boss e.g. if boss does left half-arena AoE, they will too
Devouring Dark
Third Art of Darkness - 3 consecutive Art of Darkness
1.) 1 orb - left or right
2.) 2 orbs - partner stack or clock phases
3.) 1 orb - left or right (the one not used in 1st orb)
PHASE 3
Obscure Woods
Flood of Obscurity
Particle Concentration - 8 meteors scattered in the arena. Break tethers first like before then run to meteors assigned to you
Anti-air / Wide-angle Combo
Ground-razing Particle Beam
Rejuvenating Balm + The Second Art of Darkness
Devouring Dark
Empty Plane
Flood of Emptiness
Hypercharged Condensation
Full-perimeter Particle Beam
The Art of Darkness - 1 orb (left or right)
The Art of Darkness - 2 orbs/glow (partner stack or clock phases)
The Art of Darkness - 1 orb (left or right)
The Art of Darkness - 2 orbs/glow (partner stack or clock phases)
The Art of Darkness - 1 orb (left or right)
The Art of Darkness - 2 orbs/glow (partner stack or clock phases)
Enrage


0 Comments